
- Outline Settings
- Bloom Effect
- Ambient Occlusion(AO)
- Anti-aliasing(AA)
- TAA and SSAA Available Levels:
Enhance your scene with real-time visual effects using the Post Processing form, available under the Scene and AR Setup tab. Click the Post Processing button to open the configuration panel.
You can apply the following effects:
- Bloom
Adds glow to bright areas for a cinematic look - Outline
Highlights selected objects with edge tracing - Anti-Aliasing (AA)
Smooths jagged edges for cleaner visuals - Ambient Occlusion (AO)
Adds soft shadows for depth and realism
While the Bloom effect relies on sprite or object overlays to achieve its glow, the Outline effect operates independently and can be applied directly to the scene.
The same applies to the Ambient Occlusion effect, which functions without overlays.
Anti-Aliasing, however, is essential—it replaces the renderer’s built-in anti-aliasing filter, which is automatically disabled when any post-processing effect is active.
⚠️ IMPORTANT
If your scene appears odd, distorted, or shows visual artifacts, the Post Processing panel is the first place to check. Try disabling individual effects to identify the cause and restore visual fidelity.
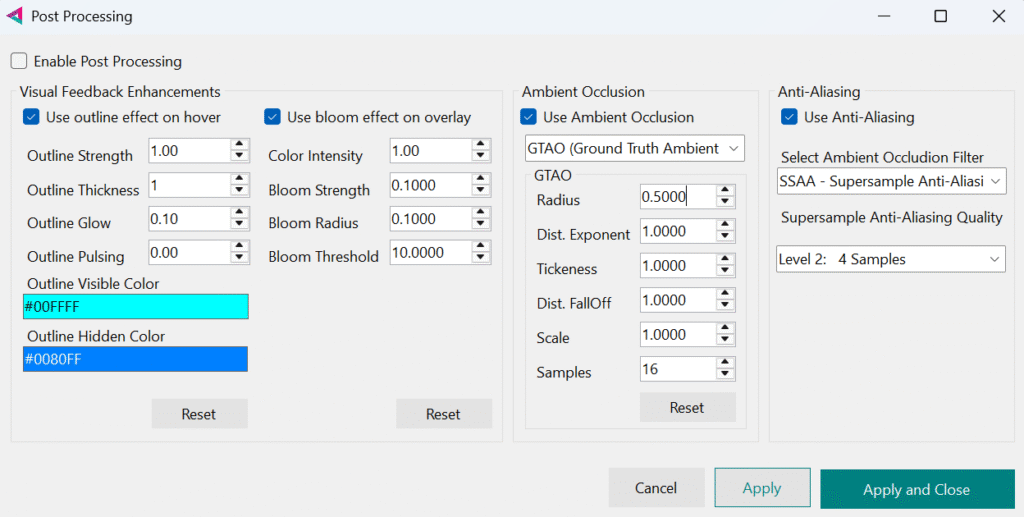
Enable Post Processing
This setting enables or disables post-processing at the global level.
You can also toggle individual effects—such as Bloom, Outline, AO, or AA—separately within the Post Processing panel.
Outline Settings
The outline effect is a post-processing visual enhancement that highlights selected objects in the scene by rendering a colored border around them.
- Use outline effect on hover
Enable or disable outline effect. - Outline Strength
Controls the intensity of the outline effect. Higher values make the outline more noticeable. - Outline Thickness
Determines the width of the outline around the object in pixels. - Outline Glow
Adds a soft halo or bloom around the outline for a stylized or glowing appearance. - Outline Pulsing
Animates the outline’s strength over time. - Outline Visible Color
Defines the color of the outline for visible edges of selected objects - Outline Hidden Color
Defines the color of the outline for hidden edges—parts of the object that are occluded by other geometry.
Bloom Effect
The bloom effect applies to the entire scene and colors below the Bloom Threshold will not produce bloom, while colors with higher intensity will.
⚠️ IMPORTANT
The bloom effect applies to the entire scene. Bloom effect will NOT work with Combined and Stereo camera.
ℹ️ INFO
To trigger bloom, a color’s Intensity must exceed the threshold value. Due to the way the effect is calculated, this value often needs to be two, three, or even more times higher than the threshold to be visually noticeable. Sometimes, dark colors or materials won’t activate the blur effect, no matter how high intensity value is, this is normal in specific lighting or contrast conditions.
- Use bloom effect on overlay
Enable or disable this functionality to add bloom effect when you hovering with your mouse over sprite objects or your imported 3d object - Color Intensity
Set intensity for your overlay color. To trigger bloom, a color’s Intensity must exceed the threshold value. - Bloom Strength
Set strength of bloom effect. - Bloom Radius
Set bloom radius. - Bloom Threshold
Set bloom effect threshold.
Since the bloom effect applies to the entire scene, it’s important to keep this value relatively high to ensure a clean and balanced render. You can then use the Color Intensity setting to selectively trigger bloom for brighter, overlay elements.
This approach helps maintain visual clarity while emphasizing key highlights.
Ambient Occlusion(AO)
Ambient Occlusion enhances depth and realism by simulating how light is occluded in creases, corners, and contact areas. You can choose between three AO modes, each with distinct performance and quality trade-offs:
🔹 SSAO (Screen-Space Ambient Occlusion)
Fastest, suitable for real-time use, but may produce noise or artifacts.
Parameters:
- Radius
Sampling radius around each pixel. Larger values increase shadow spread but may blur details. - Min Distance
Minimum depth difference to consider occlusion. Helps ignore flat surfaces. - Max Distance
Maximum depth difference for occlusion. Controls how far shadows extend.
🔸 SAO (Scalable Ambient Occlusion)
Higher-quality AO with smoother gradients and better edge handling. More GPU-intensive.
Parameters:
- SAO Bias
Depth bias to reduce self-occlusion artifacts. Higher values push occlusion away from surfaces. - SAO Intensity
Strength of the occlusion effect. Higher values produce darker shadows. - SAO Scale
Multiplier for occlusion radius. Controls spread and softness. - Kernel Radius
Number of samples used for occlusion. Larger radius improves smoothness but reduces performance. - Min Resolution
Minimum resolution for AO pass. Lower values improve performance but reduce detail.
🔶 GTAO (Ground-Truth Ambient Occlusion)
Best visual quality, simulates realistic soft shadows. Very slow, recommended for high-end setups or baked scenes.
Parameters:
- Radius
Sampling radius for occlusion. Larger values produce broader shadows. - Distance Exponent
Controls how occlusion fades with distance. Higher values reduce far-field occlusion. - Thickness
Simulates surface thickness for more accurate shadowing. Helps avoid thin-surface artifacts. - Distance Falloff
Controls how quickly occlusion fades with depth. Lower values preserve more distant shadows. - Scale
Global multiplier for occlusion strength. - Samples
Number of samples used per pixel. More samples improve quality but reduce performance.
Anti-aliasing(AA)
Anti-aliasing smooths jagged edges in your scene, improving visual quality and reducing pixelation. You can choose from several techniques, each with its own trade-offs in performance and sharpness:
🔹 FXAA (Fast Approximate Anti-Aliasing)
A lightweight shader-based method that softens edges quickly. It’s fast but can slightly blur fine details.
- Method: Shader-based edge smoothing
- Performance: Very fast, minimal GPU impact
- Visuals: Softens edges effectively but may slightly blur fine details
- Best for: Real-time scenes where speed is critical
🔸 SMAA (Subpixel Morphological Anti-Aliasing)
A more advanced technique that detects edges and applies targeted smoothing. Sharper than FXAA and great for UI-heavy scenes.
- Method: Edge detection + targeted smoothing
- Performance: Moderate — slightly heavier than FXAA
- Visuals: Sharper than FXAA, preserves UI and text clarity
- Best for: UI-heavy scenes or stylized visuals
🔶 TAA (Temporal Anti-Aliasing)
Temporal Anti-Aliasing (TAA) blends samples across frames to smooth edges and reduce flicker. You can control its quality and performance using sampling levels, similar to SSAA.
- Method: Blends samples across frames
- Performance: Moderate to high, depends on motion
- Visuals: Produces clean edges and smooth motion, but may cause ghosting or blur
- Best for: Static or slow-moving cameras; not ideal for fast motion
🟣 SSAA (Supersample Anti-Aliasing)
Supersample Anti-Aliasing (SSAA) improves image quality by rendering the scene at a higher resolution and then downsampling it. This reduces jagged edges and produces extremely crisp visuals, but at a significant performance cost.
- Method: Renders at higher resolution and downsamples
- Performance: Very heavy on GPU
- Visuals: Crisp, high-fidelity results with minimal artifacts
- Best for: High-end setups or baked scenes where quality is paramount
TAA and SSAA Available Levels:
Level 0 – 1 Sample
No supersampling. Fastest performance, but lowest visual quality.
Level 1 – 2 Samples
Slight improvement in edge smoothness with minimal performance impact.
Level 2 – 4 Samples
Balanced quality and performance. Recommended for mid-range systems.
Level 3 – 8 Samples
High-quality edges with moderate GPU cost.
Level 4 – 16 Samples
Very sharp visuals, suitable for high-end systems or still-frame rendering.
Level 5 – 32 Samples
Maximum clarity and edge smoothness. Extremely GPU-intensive and generally impractical for real-time use.
ℹ️ Performance Tip
Level 0 offers the best performance but lowest quality.
Level 5 delivers unmatched clarity but is often impractical for real-time applications.
Recommended: Use a mid-level setting (e.g., Level 2 or 3) for a good balance between quality and performance.
⚠️ Note
When any post-processing effect is active, the renderer’s built-in anti-aliasing is disabled. Choose one of the above AA methods to maintain edge quality.
Each effect includes a dedicated Reset button that restores all its settings to their default values.
Use this to quickly undo changes and return to the original configuration.