- Camera Types
- Perspective Camera
- Orthographic Camera
- Stereo Camera
- Combined Camera
- Camera Position
- Camera Target Position
- Fill Data from Browser
- Update Camera
Camera Types
You can choose between four types of cameras for your scene, each suited for different purposes:
- Perspective Camera
Camera that uses perspective projection. Mimics how the human eye perceives the world, creating realistic depth. Use this for realistic scenes where depth matters – like architectural visualizations or object showcase. It is the most common projection mode used for rendering a 3D scene.
- Orthographic Camera
Camera that uses orthographic projection. In this projection mode, an object’s size in the rendered image stays constant regardless of its distance from the camera. Perfect for 2D projections or technical drawings, like blueprints.
Increase the zoom level for more detailed views of small elements.
- Stereo Camera
Dual Perspective Cameras used for Stereoscopic 3D effect. Designed for rendering 3D scenes for devices like VR headsets or for stereoscopic effects. Ensure the focus distance aligns with key objects in your scene for proper depth perception. - Combined Camera
A hybrid of perspective and orthographic cameras, offering flexibility to use both in a single project for different viewing angles.
You can switch the view between Perspective and Orthographic Camera using “O” and “P” keys on your keyboard.
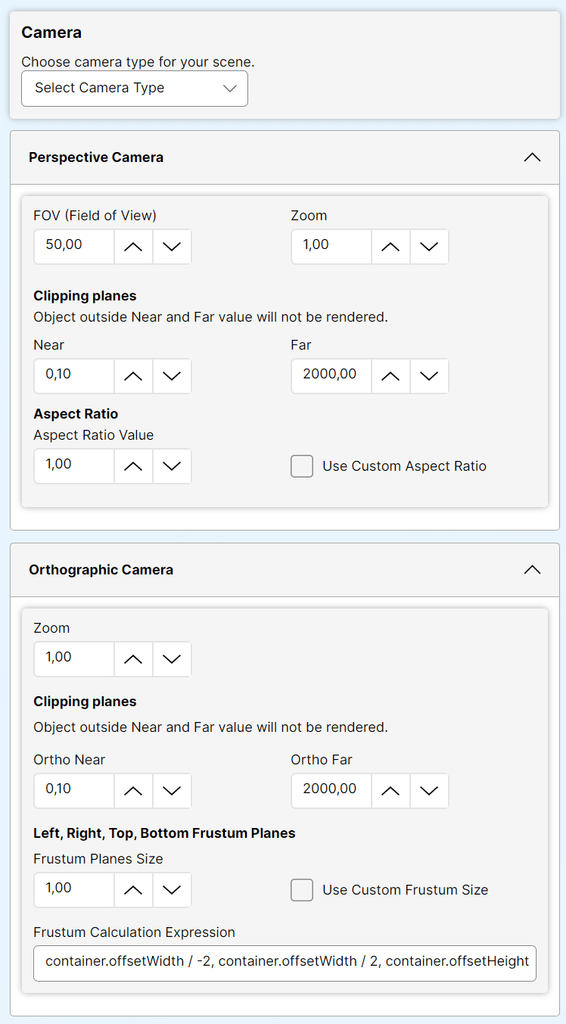
Perspective Camera
- Field of View (FOV)
Control how wide the camera view is. This value represents the camera’s vertical frustum (the viewable area from top to bottom) and is expressed in degrees (default is 50.00). - Zoom
Control zoom level of your perspective camera. Adjustable for zooming in or out of the scene (default is 1.00). - Clipping Planes
Define the visible range of the camera. Objects between near and far clipping plane are visible in scene.- Near
Minimum distance from the camera where rendering starts.
This value cannot exceed the Far value. - Far
Maximum distance from the camera where rendering ends. Object farther away from this value will not be rendered in scene.
This value cannot be smaller then Near value.
- Near
- Aspect Ratio
In scene, aspect ratio is automatically calculated for your canvas, but if your scene looks stretched or compressed, you can set custom aspect ratio for your scene.
If this checkbox is checked, in the field on the side, you can set your own value.
Aspect ratio refers to the proportional relationship between the width and height of an image, video, screen … or in our case, canvas where rendering is displayed. You can experiment with other values but if you want best results, you don’t need to change anything.
Some common examples:
- 16:9: Widescreen format (value would be 16/9=1.78)
- 4:3: Older TVs and computer monitors format (value would be 4/3=1.33)
- 1:1: Perfect square format (often used for social media platforms like Instagram). Value would be 1.00
- 21:9: Ultra-widescreen format used for cinematic content and some gaming monitors (value would be 21/9=1.33)
But, as mentioned above, this field is automatically calculated, and with Pixel Ratio value taken from device every rendering gives you best possible solution for your scene on any used display.
Orthographic Camera
- Zoom
Control zoom level of your orthographic camera (default is 1.00). - Clipping Planes (Near and Far)
Same to the perspective camera, defines the visible range of the orthographic camera. Objects between near and far clipping plane are visible in scene. - Near
Minimum distance from the camera where rendering starts.
This value cannot exceed the Far value. - Far
Maximum distance from the camera where rendering ends. Object farther away from this value will not be rendered in scene.
This value cannot be smaller then Near value.
Camera Frustum
If we have near and far planes for our camera, frustum is the object which connect those two planes.
Four planes (left, right, top, and bottom) connect the near and far planes to create the frustum.
This setting typically doesn’t need to be adjusted.
- Use Custom Frustum Size
If you check this checkbox, you can set custom plane sizes to be used in calculation of our orthographic camera frustum.
- Frustum Planes Size
You can adjust specific planes size for left, right, top, and bottom plane.
For every plane in frustum, size default calculation is canvas width or height divided by two( positive or negative ).
Custom calculation is Custom Frustum size multiplied by canvas Aspect Ratio and divided by two( positive or negative ) for every plane in frustum.
If Custom Aspect Ratio is enabled, this value will be used in custom calculation for frustum.
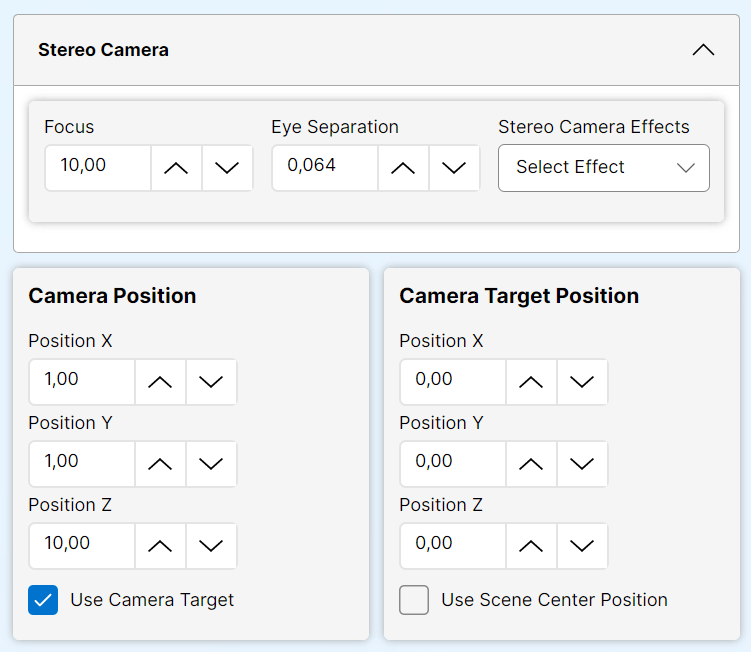
Stereo Camera
- Focus
Set object distance from camera.
- Eye Separation
Set the distance between left and right camera.
- Stereo Effects
Choose type of effect you want to use for stereo camera. Options are:- Parallax Barrier is a clever technology used to create 3D images with enhanced depth perception without the need for special glasses.
You can find more info on https://en.wikipedia.org/wiki/Parallax_barrier - Anaglyph 3D is a technique used to create stereoscopic 3D images by encoding two slightly different perspectives of the same scene into a single image using color filters.
You can find more info on https://en.wikipedia.org/wiki/Anaglyph_3D - Stereo Effect – Stereoscopy, also known as stereo imaging or 3D imaging, is a technique used to create the illusion of depth in an image by presenting two slightly different perspectives to the viewer’s eyes.
You can find more info on https://en.wikipedia.org/wiki/Stereoscopy
- Parallax Barrier is a clever technology used to create 3D images with enhanced depth perception without the need for special glasses.
Combined Camera
Combined camera simply adds two cameras to your scene, one perspective and one orthographic camera. Press the “O” and “P” keyboard keys to switch between cameras.
IMPORTANT
Unfortunately, you can not use Pot Processing with Stereo Camera.
Camera Position
This set of controls allows you to precisely control the camera’s location in 3D space.
- Position X, Y, Z
Adjust these values to position your camera within the 3D space. - Use Camera Target
Enable or disable camera targeting to a specific point in the scene.
IMPORTANT
If you enable camera target to look at screen center, you will lock controls to target position e.g. right mouse button PAN will not work as expected.
Camera Target Position
Defines the point where the camera should be focused:
- Position X, Y, Z
If use scene center is not enabled, you can set custom point of interest for your camera. - Use Scene Center Position
Enable option to automatically align camera to look at the center of the scene.
Fill Data from Browser
Used to retrieve data from preview browser. When you click this button you will automatically fill camera X,Y,Z position data and also camera target X,Y,Z position data.
IMPORTANT
To retrieve data from the preview browser, you first need to activate values by interacting with your scene. Simply set your camera view in the browser, and then you can access the values using “Fill Data From Browser”.
Update Camera
Click update camera button to save all settings used on “Camera” page to your project file. After this, your changes should be visible in web browser preview window on right side of application.