
Project Setup
Project Setup Overview
- Project Setup Overview
- Project Initialization
- JavaScript Package Configuration
- Frontend Feature Integration
- Scene Helpers Group
- Helper Customization
- HTML Interface Elements
This interface allows you to configure and launch a web-based 3D scene with minimal setup. Each option below is designed to help you customize your project’s behavior and appearance without requiring programming knowledge.
Project Initialization
- Project Name
Enter a unique name for your project. This field is required to begin. - Server/Project Root Folder
Choose where your projects will be saved on your computer. All projects will be stored inside this folder.
When using custom server, this path must point to server root folder on your pc. - Create New Project
Initializes a new project using the specified name and store folder. - View Files
Open project’s local folder in File Explorer or Finder on mac. - Server Address
Enter the web address used to preview your project in a integrated web browser.
Format: http(s)://yourdomain.com:port
Example: http://localhost:3000
If Node.js is installed, this field is pre-filled and the server starts automatically. - Navigate and Reload Preview
The Navigate button directs your web browser to the server URL you enter, while the Reload Preview button refreshes the server preview in your browser to reflect recent changes. Although most changes sync automatically, a manual refresh may occasionally be required. - Save Project
Saves the current configuration and assets for future use.
This will create .3proj file with current project snapshot. - Open Project
Loads an existing project from your saved directory.
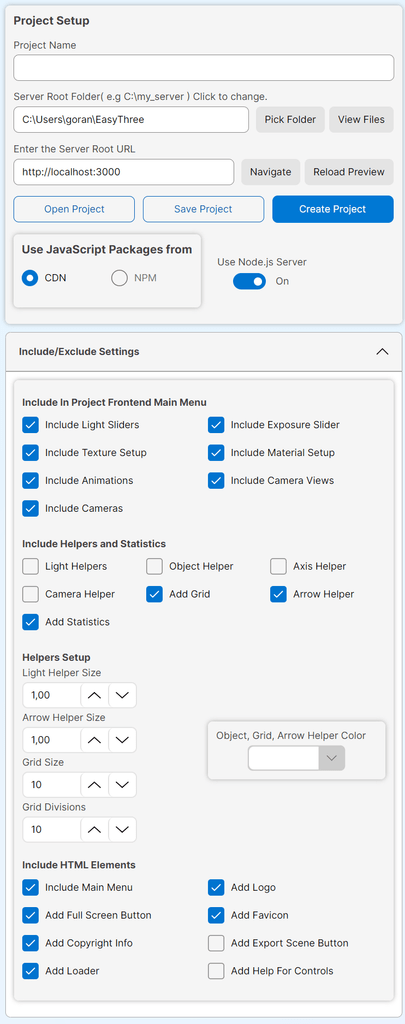
JavaScript Package Configuration (for Node.js server)
- Use JavaScripts from CDN
Loads required libraries from the internet. Recommended for lightweight, online projects. - Use JavaScripts from NPM
Downloads or use existing libraries locally for offline use. Adds approximately 30 MB of files to your system.
If you are running EasyThree in offline mode (without internet), this must be set to NPM, and the required libraries will be installed from the archive file that comes with EasyThree. - Use Node Server
Automatically enabled if Node.js is detected.
Uncheck to use a custom web server and path instead.
When creating a project, the default configuration is to use a Node.js server. Once the project is created, this cannot be changed, and the button becomes disabled.
If you use a custom web server, the switch button remains enabled, allowing you to switch to Node.js at any time while working on your project.
Frontend Feature Integration
- Light Sliders
Adds interactive sliders to control the intensity of scene lights. - Exposure Slider
Enables a Tone Mapping Exposure slider to adjust overall scene brightness. - Texture Setup
Provides tools for configuring UV mapping and texture placement. - Material Setup
Adds controls for editing basic material properties such as roughness, metalness, and transparency. - Animations
Displays animation controls if the loaded 3D model includes animation tracks. - Camera Views
Adds buttons for switching between predefined camera views.
You can manage clickable 3D points via the Camera Views tab. - Cameras
Enables camera controls for imported model.
If the model includes embedded cameras, they will be loaded automatically.
Scene Helpers Group
- Light Helper
Visualizes the position and influence of lights in the scene. - Object Helper
Displays bounding boxes around selected objects for easier identification. - Axis Helper
Shows the X (red), Y (green), and Z (blue) axes to orient the scene. - Camera Helper
Marks camera positions and directions within the 3D environment. - Grid
Adds a reference grid at the origin (0,0,0) to assist with alignment. - Arrow Helper
Displays directional arrows to visualize normal direction when raycasting objects. - Statistics
Add real-time performance statistics to visualize how smoothly your scene runs, especially in terms of frames per second (FPS). This helps you evaluate rendering efficiency and optimize for better user experience.
Helper Customization
- Light Helper Size
Adjusts the visual size of light indicators. - Arrow Helper Size
Sets the scale of arrow helpers used when raycasting. - Grid Size
Defines the overall dimensions of the grid. - Grid Divisions
Specifies the number of horizontal and vertical lines.
Example: 10 divisions = 10×10 grid. - Set Helpers Color
Applies custom colors to grid, arrow and object helpers.
Light helpers inherit the color from the light source.
Axis and camera helpers use predefined colors.
HTML Interface Elements
- Main Menu
Toggles visibility of the main navigation menu on the frontend. - Export Scene Button
Adds a button to export the current scene as a GLTF or GLB file.
All visible element including grid, arrows, and helpers are included.
You can choose to export just imported model.
This also enables USDZ export for viewing on Apple devices in AR mode.
Learn more on our FAQ page. - Favicon
Displays a custom icon in the browser tab.
Image selection is available on the HTML setup page. - Logo
Adds your brand logo to the interface.
Upload your image via the HTML setup page. - Loader
Shows a loading progress bar while the scene initializes.
Custom loaders can be configured on the HTML setup page. - Full Screen Button
Adds a button to toggle full-screen mode for immersive viewing. - Help
Displays brief instructions for navigating and interacting with the scene. - Copyright
Adds copyright information to the footer of your webpage.