
The Woo Export tab contains a single button: ‘Prepare and Export WooCommerce Product’. This serves as a shortcut to the full ‘WooCommerce Product Export’ form.
- WooCommerce Product Export
- Why is important to keep data in sync?
- Product Variations panel
- Product Configuration
- Utility Buttons
- Export Product
WooCommerce Product Export
IMPORTANT
WooCommerce Export Form exports your project as WooCommerce product. To actually connect data from project to your shop you need to install our WordPress plugin. To learn how this connection work and how to configure our plugin, you can go to WordPress plugin page.
To connect and authenticate with the WordPress and WooCommerce REST API, you’ll need the JWT Authentication for WP REST API – plugin installed, activated, and properly configured according to its documentation.
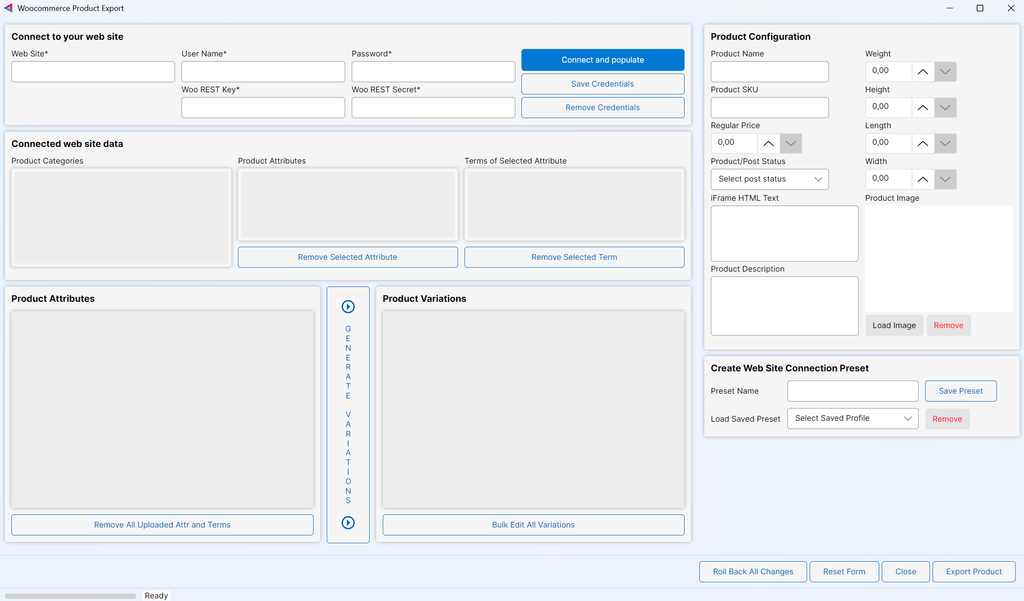
This guide explains how to use the WooCommerce Product Export form to connect your site, manage product data, and export products efficiently.
The WooCommerce Product Export form is a tool designed to export products, images, attributes, and variations from a your application to a WooCommerce (WordPress) website using the WordPress and WooCommerce REST API. It supports connection management, product creation, image uploads, and variation handling, all through a user-friendly interface.
Typical Usage Flow
1. Connection Management
- Enter and store WordPress and WooCommerce API credentials (site URL, username, password, REST key/secret).
- Connect to the REST API and test the connection and if everything is ok, categories and attributes list should be populated.
- You can save, load, and delete connection presets for different websites you are working on.
2. Attribute and Variation Handling
- Automatically create controls for attributes and terms from Saved Textures panel.
- Edit, delete and configure attribute images as terms.
- Generate all possible product variations.
- Bulk edit all variations.
- Edit or delete individual variations as needed.
3. Product Export Workflow
- Configure product data: name, SKU, price, main image, attributes, variations and description.
- For proper integration with a WooCommerce Shop, verify that the iFrame field contains a valid URL pointing to the correct resource. Ensure the protocol (http/https) and domain match your shop configuration.
- To assign your product to a specific category, select one from the Categories list.
- Validate required fields before export.
- Upload your product with “Product Export” button
4. Cleanup
- If you’re not satisfied with your configuration, you can remove all uploaded items by clicking Roll Back All Changes. This option remains available as long as the application is running and the form hasn’t been reset with Reset Form button.
WooCommerce Product Export – Interface Overview
1. Connect to Your Website
These controls must be configured properly to establish a connection with your website. The WooCommerce REST API is built on top of the WordPress REST API, so credentials for both APIs are required. Our application use WordPress API for image upload and all other parts are managed with WooCommerce API.
Ensure both APIs are properly configured for full functionality.
- Website URL
Enter the full URL of your WordPress/WooCommerce site. - Username & Password
Use your WordPress admin credentials.
User must have administrative rights to access WordPress REST API - Woo REST Key & Secret
Generate these from WooCommerce → Settings → Advanced → REST API.
You can read more at WooCommerce website on this link. - Connect and Populate
Click to test and populate categories and attributes product data from your website. - Save Credentials
Stores your main website login information for future sessions. These credentials are saved independently and are not tied to any preset. When you open the form, it will automatically populate using this saved configuration.
You can later switch to a saved preset if needed. - Remove Credentials
Clear saved login info.
2. Create Website Connection Preset
If you are working on different websites or other projects, here you can save different login configurations for later use.
- Save Preset
Enter preset name and save your current connection setup. After connection preset is saved it will be added to Select a saved preset list. - Load Preset
Select a saved preset from the dropdown. - Remove Preset
If needed, you can delete the selected preset.
3. Connected Website Data
- Product Categories
Lists all categories from your WooCommerce store. - Product Attributes
Displays all available attributes (e.g., size, color) from your WooCommerce store. - Terms of Selected Attributes
Shows values for selected attributes. - Remove Selected Attribute
Deletes the chosen attribute from your WooCommerce store.
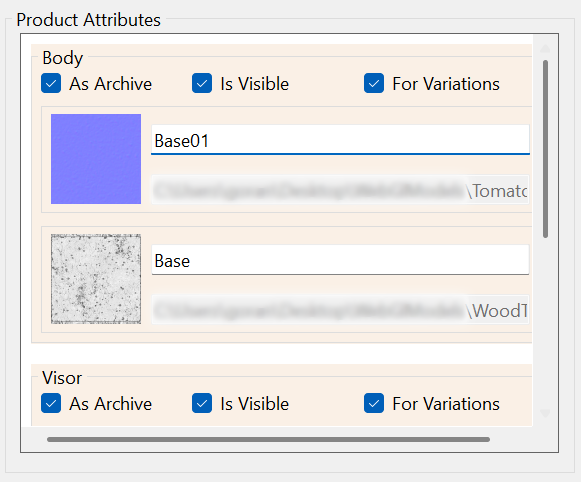
4. Product Attributes
Mirror and display all created attributes from the Saved Textures panel in the 3D Model and Material page.
Each Texture Group becomes a product attribute, and each image within that group becomes an attribute term.
- The attribute name corresponds to the saved texture name.
- The attribute term name is the image name.
You can rename an attribute term (i.e. the image name) directly in this control list.
To rename a product attribute (i.e. the Texture Group name), use the Saved Textures panel.
If these two lists become unsynchronized, a message popup will notify you.
To preserve the WooCommerce Export Data form and all filled fields:
- The form is created the first time you click Prepare and Export WooCommerce Product.
- It is destroyed when you terminate the application.
If the form becomes out of sync with the rest of the project, or if you’re not satisfied for any reason, you can reset it using the Reset Form button.
Why is important to keep data in sync?
When you configure and upload your project to a live web server, any texture change on your frontend HTML triggers a message sent to event listeners.
In this case, the listener is your WooCommerce product.
When you embed an iFrame into your product page, that page listens for every message sent from the iFrame.
If the message is invalid or the listener can’t locate the expected data, nothing will happen.
Here’s how it works:
- Suppose you click on a texture named “My Image” in the iFrame.
- A message is sent out, and the product page (via our plugin) listen for and catch it.
- The plugin searches all associated product attributes for a term named “My Image”.
- If it finds a match, it automatically selects that term in the corresponding attribute list.
If your product has a variation with that term:
- The product is automatically configured and ready for purchase with that attribute term.
- If the variation has a different price than the main product, that price will be selected and displayed.
⚠️ Important:
If your product has already been exported and you later change the Texture Group, the attribute term may no longer be found.
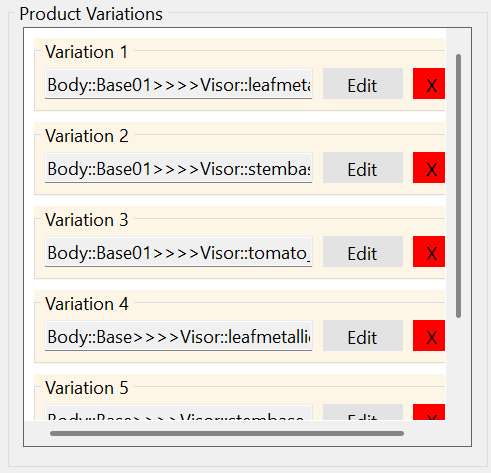
5. Product Variations
- With “>>> Variations” button you generate all possible combinations from included attributes.
Your attribute group must be enabled for calculations, “For Variations” checkbox must be checked. - Product Variations panel shows all generated product variations and on that panel you can manage every single variation.
After you get all possible variations, you can manage all variations with: - Bulk Edit All Variations: allows you to edit all product variations at once.
Use this section to fill in shared properties across variations.
You can later fine-tune individual variation in the main form.
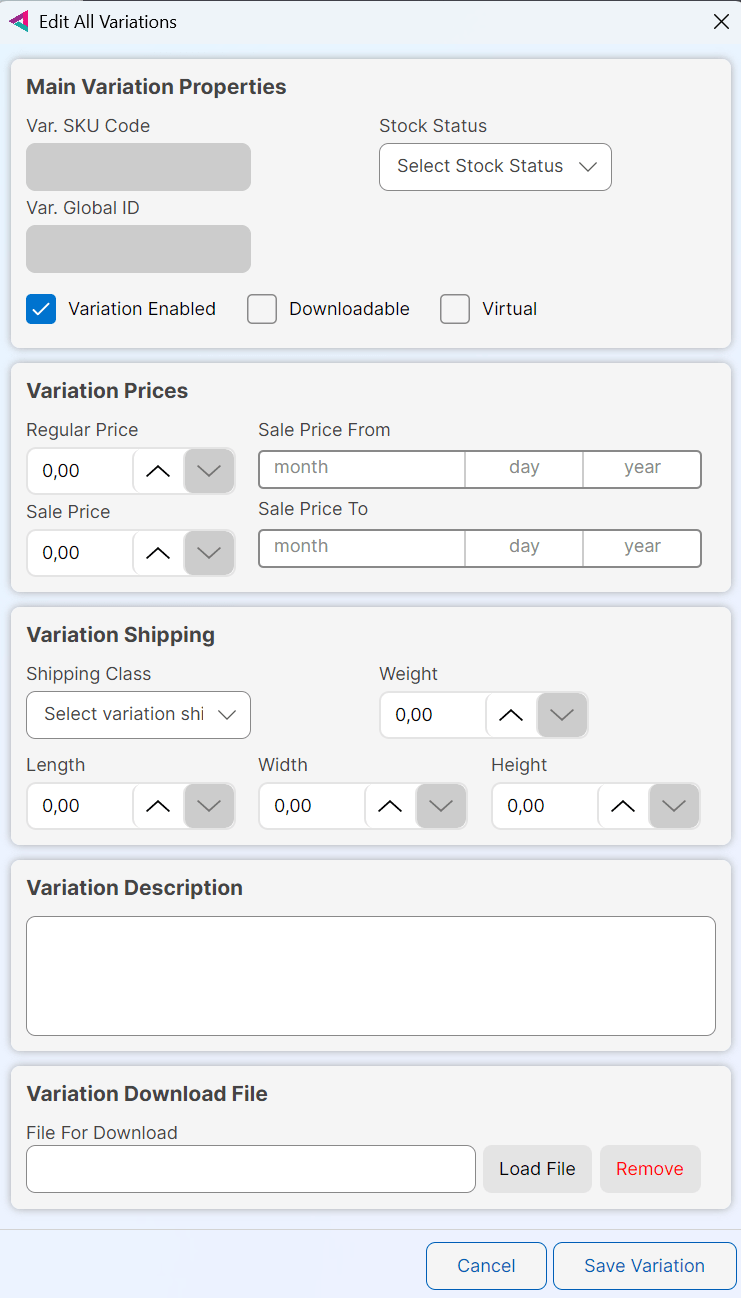
Product Variations panel
1. Main Variation Properties
- Product Var. Code
Unique SKU identifier for the variation. - Variation Enabled / Downloadable / Virtual
These checkboxes allows you to toggle variation status and type. - Stock Status
Choose whether the variation is in stock or not.
2. Variation Prices
- Regular Price / Sale Price
Set regular pricing for the variation and sale price if any. - Sale Price From / To
If sale price is added, you can schedule a sale period with start and end dates.
3. Variation Shipping
- Shipping Class
Assign a shipping category. - Dimensions & Weight
Input physical specifications for shipping calculations.
4. Variation Description
- Add a custom description for the variation.
5. Variation Download File
- Upload a file if the product is downloadable (e.g. software, eBook).
- Load and remove buttons to load or remove the file.
The product variations panel is shared between bulk and single edits.
Whether you’re editing all variations at once or just one, the interface remains the same.
6. Product Configuration
This group of controls enables you to set all product important fields.
- Product Name, Code (SKU Code), Price
Set basic product details product name (can’t be empty), product SKU Code and product price. - Product/Post Status
Set status of your product after upload. Status is one of WordPress statuses:
Publish, Draft, Private, Pending. - Product Dimensions
Set product weight and also product height, length and width. - iFrame HTML Text
Field will be automatically populated from FTP iFrame text field on firs open, if any.
If your project is saved on different URL address, you can change text here. Before you upload your product, please review iFrame text and URL address. - Product Description
You can add product description. - Image Controls
Enables you to Load or remove main product image.
Main Product Image
On your WooCommerce store on single product page, main image is replaced with iFrame exported here. On all other pages (archive, catalog etc.) main image will be still visible.
Command Buttons
- Remove All Uploaded Attributes and Terms
With this button you can clear all uploaded attributes and terms. - Roll Back All Changes
If you’re not satisfied with the uploaded data, use this button to delete all added data from your website.
Uploaded data persists in memory until the application is closed or the form is manually reset. - Reset Form
This action clears all input fields and selections, restoring the form to its initial state. - Cancel
Exits the form.
Export Product
- Export Product
This is the final step to send product data to your WooCommerce store. Please review all inputs carefully, this action will add a substantial amount of data. While it can be deleted later, doing so is not recommended.
✅ Summary
This form provides a complete workflow for exporting rich product data, including images, attributes, and variations, from a local application to a WooCommerce store. It combines robust API integration with dynamic UI controls and preset management to streamline the export process.